

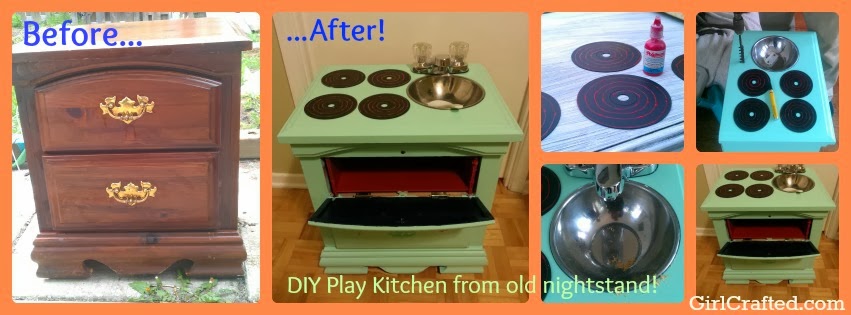
PLAY KITCHEN FROM AN OLD NIGHT STAND:
YOU WILL NEED:
-an end table or night stand
-sandpaper
-primer
-paint
-CD's
-Spray paint
-Puffy paint

-a tin bowl
-a faucet
-a magnet and a washer
-tools
-patience
STEPS:
1. Prime and paint your nightstand.
Well, sand, then prime, then paint. I hate sanding, so I'll just say: do a better job of it than I do.

2. Paint your CD's.
Four CD's, spray painted with a black matte finish, will make great stove elements. I used red puffy paint to make the red-hot elements.

3. Cut out the bowl hole.
This will be your sink. Carefully measure so that your bowl, which will ideally have a lip, doesn't fall through the hole. I left this step up to my dad.

3b. Glue the 'elements' into place.
'Nuff said.

Gluing the bowl into the hole can be done with a variety of adhesives, but I think we used something industrial-grade from Home Depot.
4. Install the faucet.
We wanted to find a used one, but it just didn't work out. Try finding one if you can; it doesn't have to function, after all. It's just nice to have the taps turn.

5. Make the oven.
Okay, there's a few steps here, starting with 'get your dad to come over with his tools':
a. Remove top drawer.

c. Glue the rest of the drawer back into the drawer hole, as this will be the belly of the oven.

d. Apply hinges to the front of the drawer to make it open from the top.

e. Glue a large washer (or other metal piece) to where the drawer front will make contact with the night stand, and glue a magnet onto the drawer front so that the magnet connects with the washer. Dad used a drill to actually embed the magnet into the drawer front.

f. Paint the inside of the 'oven' with whatever colours you like.
And that's about it!

Blueberry loved it. She was blown away and she plays with it constantly. The bottom drawer works well as a storage area and it's the perfect size for her bite-sized bedroom.
While it took a while to make and involved a lot of work, the entire thing cost me $5.00 for the secondhand nightstand, plus $25.00 for the faucet, and is way cooler than any of the expensive pink nasty things we checked out at the toy store.
No comments:
Post a Comment
Might I suggest you copy/paste your comment before you hit 'submit', just in case the internet gremlins eat your first attempt? :)